
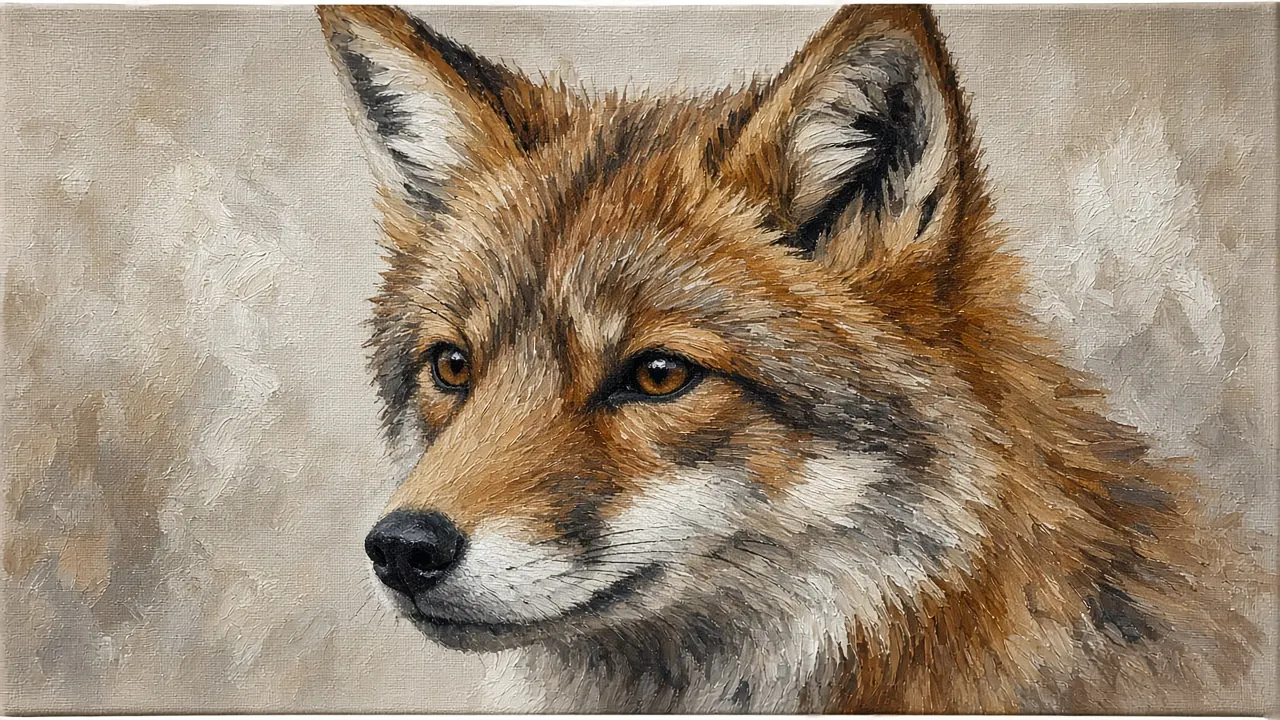
Fur reads as direction and value, not as every hair drawn separately. Dry brushing lets you drag broken color over a dry underpainting so the tooth of the canvas catches paint in thin streaks that look like hair.
Start with solid forms, not fur
Block the animal in mid-tones first: head shape, ear placement, body masses. Establish the darkest shadow shapes and the light side. Fur texture on top of a weak drawing will not save the painting.
How to dry brush
Load a stiff flat or filbert with thick paint, then wipe most of it off on a paper towel until the brush leaves broken marks. Drag lightly in the direction the fur grows: radiating from the nose on a muzzle, following the curve of the shoulder, shorter and denser around the eyes.
Use at least three values: a shadow pass, a mid-tone pass and a highlight pass. Cooler or darker strokes in the shadows and warmer or lighter strokes on the light side sell the form.
Eyes and wet noses first
Paint the eye and any wet highlights before the finest fur around them, then weave short fur strokes up to the eyelid. A crisp eye catchlight makes soft fur look intentional. See also how to paint believable animal eyes.
Common mistakes
- Too much paint on the brush (you get solid strokes, not fur).
- All strokes the same length and direction.
- Pure black for shadow fur (mix darks from ultramarine + burnt umber + the local color).
For subject ideas, browse the Animals & Birds hub.
Short vs long fur
Short facial fur needs denser, shorter strokes that follow the skull. Body fur can be longer and more broken. Leave some underpainting showing between strokes so the coat does not turn into a solid mat. If strokes look pasted on, they are usually too thick on the brush.
Materials
- Stiff flat or filbert, soft round for eyes, liner optional
- Local fur colors plus a dark mix (ultramarine + burnt umber) and titanium white
- Paper towel for wiping the brush nearly dry
Full workflow
- Draw proportions carefully.
- Block mid-tones and shadow shapes with no fur texture.
- Confirm the eye placement (see the animal eyes guide).
- Dry-brush shadow-direction fur.
- Dry-brush mid values.
- Dry-brush shorter highlight strokes on the light side.
- Refine fur into the eyelids last.
Direction maps
Muzzle fur radiates from the nose. Cheek fur curves around the jaw. Forehead fur often runs back toward the ears. Ignoring direction makes even tidy strokes look like grass stuck on a balloon.
Troubleshooting
- Solid streaks → wipe more paint off the brush.
- Hairpiece look → vary length and leave underpainting gaps.
- Dead gray fur → introduce warm and cool versions of the local color.
Underpainting colors for fur
A warm mid-tone underpainting can glow through broken dry-brush strokes and keep fur from looking like plastic. Some painters block animals in burnt sienna or raw umber first, then build local color. Others block in the true local mid-tone. Either works if values are honest.
Avoid outlining the entire animal in dark pencil-thick contours before texturing. Contours can help placement early, but a finished outline cage makes fur look glued inside a border. Let texture and value turn the form.
Photograph animals with clear light from one side when possible. Multiple competing lights flatten fur planes and confuse catchlights in the eyes. If you work from a busy flash photo, simplify the light logic before you paint.
Short study idea: paint a 4×4 inch square of fur only, no face. Practice three values and direction changes. Then return to a full head study.
Session planning
Work in timed sessions. A thirty-minute block for blocking shapes and a later block for edges keeps decisions clearer than a single exhausted evening. Photograph the painting in daylight at the end of each session so you can judge values without wet-paint optimism.
Keep a paper towel diary swatch of key mixes with a one-line note (“crest turquoise”, “far hill”). Acrylic mix memory fades quickly once piles skin over.
Return to this guide after one practice canvas and note which step failed first: drawing, value, color, or edges. Fix that step on the next canvas instead of changing every variable at once.
Value first, color second, hair last
Animals read at a distance through value patterns: the dark eye patch, the light muzzle, the shadow under the jaw. If those patterns are wrong, no amount of hair texture will help. Block them solidly and step back ten feet before dry-brushing.
Dry brushing on a slick glossy layer may slip. If your underpaint is too shiny or oily from additives, scumble a thin matte layer first or choose a gel that dries with more tooth. Standard acrylics on gessoed canvas usually provide enough grab.
Layer fur in passes aligned to anatomy. Do not randomize stroke directions for “energy” on a realistic head; random direction reads as damage. Save wild direction changes for expressive or abstract animal work where that is the point.
Whiskers and fine hairs come last with a liner and slightly fluid paint. Paint fewer whiskers than reality. Suggesting three convincing whiskers beats twenty shaky ones.
Black animals still need value variety. Reflections and sheen planes keep black fur from becoming a hole. Mix darks from ultramarine and umber, then add tiny temperature shifts between shadow and light sides.
Putting it into a weekly practice
Choose one small canvas size and repeat the same exercise three times in one week rather than inventing a new subject every session. Repetition reveals which mistakes are habits. Keep notes on drying time in your room, which mixes skinned too fast, and which edges looked best in a daytime photo.
Share progress with yourself by lining up the three attempts side by side. The middle attempt is often where understanding appears: not yet polished, but clearer than the first. Use the third attempt to apply only one improvement goal, such as cleaner edges or better value range.
When a painting fails, scrape or gesso over it and reuse the panel for drills. Failure panels are cheaper teachers than unused premium canvases that intimidate you into stillness. Momentum matters more than preciousness while skills are forming.
Finally, connect technique pages to subject hubs so practice has a destination. A blending drill should lead to a finished small landscape; a dry-brush drill should lead to a small animal study. Technique without a next painting becomes abstract advice that evaporates.
Edges of fur masses
The outer contour of an animal should alternate soft and sharper edges. Soften fur against background in places so the creature sits in air; keep a few sharper notches where the form turns abruptly. A continuous hard cutout edge looks like a sticker regardless of internal texture quality.
Background value should be chosen to support the fur key. Dark animals often need a medium ground; light animals often need a slightly darker field. Adjust grounds early, not after finishing facial detail.
If dry-brush dust lands where you do not want it, lift gently with a barely damp clean brush immediately or wait and spot-cover with background color.
\nStudio habits for fur practice
Set a single measurable goal before each session, such as “softer joins,” “stronger darks,” or “fewer corrective scrubs.” Goals that try to fix everything produce scattered attention. Write the goal on painter tape at the easel edge.
Use inexpensive panels for drills and reserve better canvases for attempts that apply a drill successfully. This separation reduces fear and increases reps. Track reps with hash marks on a calendar; skill in acrylic handling is closer to deliberate practice than to inspiration hunting.
When stuck, copy a five-minute passage from a teaching video onto scrap without aiming for a finished painting. The point is motor learning: brush angle, load, and timing. Then return to your own composition and apply only that motion.
End sessions by noting one keep and one change. Keep notes short. Over time the notebook becomes a personal troubleshooting index more useful than generic tips, because it reflects your room, paints and habits.
Revisit this guide after three practice pieces. If the same failure repeats, change only the related step in the workflow rather than abandoning the subject. Persistence with targeted adjustment beats constant subject hopping.
\n
Hi, I’m Camille. I write The Everyday Painter, where I share acrylic painting ideas, beginner guides and practical fixes for common painting problems. I love color, simple compositions and projects that fit into an ordinary evening.