
Is your Shark vacuum losing suction or making strange noises? You might need to check the belt. A worn or broken belt can seriously affect your vacuum’s performance, leaving your floors less than spotless.
Key Takeaways
- Importance of the Vacuum Belt: The vacuum belt is essential for effective cleaning, as it transfers power from the motor to the brush roll.
- Effects of Wear and Damage: A worn or broken belt leads to reduced suction, unusual noises, and inadequate cleaning performance.
- Signs to Check the Belt: Look for visual wear, sudden loss of suction, and lingering debris on floors as indicators that the belt may need inspection.
- Regular Maintenance: Check the vacuum belt every 3 to 6 months and replace it when signs of wear are detected to ensure optimal functionality.
- Essential Tools Required: Gather necessary tools such as a screwdriver set, replacement belt, flashlight, and cleaning cloth to facilitate the inspection and replacement process.
- Follow Specific Steps: Always unplug the vacuum before accessing the belt, inspect for damage, and replace it as needed, following the manufacturer’s guidelines for best results.
Understanding The Importance Of The Vacuum Belt
The vacuum belt plays a crucial role in maintaining your Shark vacuum’s efficiency. A functional belt transfers power from the motor to the brush roll, allowing for effective dirt and debris removal.
Effects of a Worn or Broken Belt
- Loss of Suction: When the belt wears out or breaks, the brush roll stops spinning. This leads to reduced suction, making it harder to lift dirt and hair from surfaces.
- Unusual Noises: A damaged belt may create grinding or squealing sounds. These sounds indicate that the vacuum struggles to operate, signaling a potential issue with the belt.
- Inadequate Cleaning: Floors may appear dirty even after vacuuming. If the brush roll isn’t spinning, it can’t agitate carpet fibers, resulting in poor cleaning performance.
Signs That the Belt Needs Checking
- Visual Wear: Inspect the belt for fraying or cracks. Any visible damage may require immediate replacement.
- Loss of Power: If your vacuum starts losing suction suddenly, the belt could be the culprit. Check it promptly.
- Cleaning Difficulty: If debris remains on floors after vacuuming, evaluate the belt’s condition as well.
Regular Maintenance
Regularly check the vacuum belt every 3 to 6 months. Maintaining the belt prevents unexpected breakdowns. Replace the belt when you notice signs of wear to keep your Shark vacuum running smoothly.
Tools Required For Checking The Belt
To check the belt on your Shark vacuum, you’ll need a few essential tools. Gathering these items before starting makes the process smooth and efficient.
Recommended Products

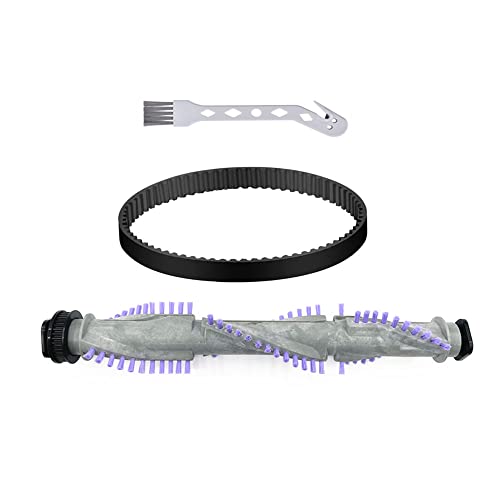
Wide Compatibility: Our belt replacement drive belts are specifically designed compatible with Shark AZ2002 AZ2000 AZ2000W AZ2000WWK HZ2002 HZ2000 LA502 LA500 LA455 UV850, part: vega 153-3GT-7. These vacuum belts ensure a perfect fit for your vacuum cleaner, providing optimal performance. perfect fit for your vacuum cleaner, providing optimal performance.
Required Tools
- Screwdriver Set: Use a Phillips screwdriver to remove screws from the vacuum cover. Ensure you have both standard and small sizes for different screws.
- Replacement Belt: Keep a compatible Shark vacuum belt on hand. Check your model number to select the correct one.
- Flashlight: Use a flashlight to inspect the belt area. Good lighting helps identify wear or damage more easily.
- Cloth or Brush: Clean any dust or debris accumulated around the belt. A cloth or brush helps keep the area tidy.
- Pliers: Pliers can assist in holding small screws or parts when reassembling your vacuum.
- Vacuum Cleaner Maintenance Manual: Having the manual nearby helps with specific instructions related to your model.
Gathering these tools ensures you’re ready to proceed with checking and potentially replacing the belt. Remember, taking time to inspect your vacuum can enhance its performance and prolong its lifespan.
Step-By-Step Guide To Checking The Belt
Checking the belt on your Shark vacuum helps maintain its effectiveness. Follow these steps for a thorough inspection.
Recommended Products
1. Wide Compatibility: For Shark Navigator NV350 NV351 NV352 NV353 NV355 NV360 NV361 NV356E 31 NV361BK NV361PR NV42 NV22 Replacement part numbers 117FFJ and 1135FC

1. Wide compatibility for Shark Rocket HV321 HV324Q HV325 HV320 HV320W HV322 HV320C HV322Q UV330 HV301 HV300 HV302 HV303 HV305 HV310 HV300LA HV300W HV300C HV300WC HV301C HV301HX HV301PL HV301Q HV302Q HV306Q HV307QBK HV307QHX HV307QQPK HV307QPR HV307QW HV308Q UV330 UV450 Vacuum Replacement Parts

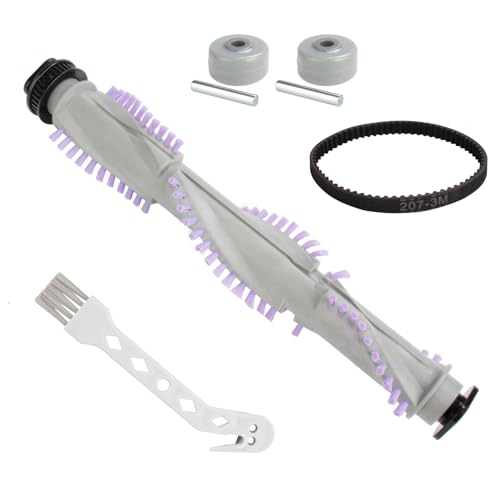
Complete Brush Roller Replacement Kit - The complete replacement kit helps you to make a perfect parts replacement for your vacuum cleaner, making your vacuum cleaner work as efficiently as it did in the first place.
Power Off The Vacuum
First, unplug your Shark vacuum to ensure safety while working. Inspecting the belt requires you to work with the vacuum’s internal components. Confirming the power is off eliminates any risk of accidental starting.
Accessing The Belt
Next, locate the screws on the bottom cover of the vacuum. Use your screwdriver to remove these screws. Gently lift the cover to expose the belt area. Depending on your Shark model, you may need to remove additional parts for complete access. Consult your vacuum maintenance manual for specific guidance.
Inspecting The Belt Condition
With the belt visible, check for signs of wear. Look for cracks, frays, or any significant discoloration. A healthy belt should appear smooth and intact. If you notice excessive wear or a loss of elasticity, it’s time to consider replacement. Additionally, observe the belt alignment and ensure it fits snugly on the motor and brush rolls.
Replacing The Belt If Necessary
If the belt shows damage, replacing it is crucial for optimal vacuum performance. To replace the belt, remove the old one by gently pulling it off the motor shaft and brush roll. Position the new belt on the motor shaft and stretch it around the brush roll. Confirm proper alignment before reassembling your vacuum. Finally, reattach the bottom cover and screws, ensuring everything is secure, then plug in your vacuum to test its performance.
Tips For Maintaining Your Shark Vacuum Belt
Recommended Products
Wide Compatibility:This for shark vacuum brush roller replacement kit is perfect compatible with shark navigator replacement parts NV350, NV35, NV352, NV353, NV360, NV356E, NV42, NV80, UV420, NV70, NV41, NV71, NV90, NV22 Series Upright Vacuum, Replace parts 117FFJ and 1135FC.(Do not fits for Shark Rotator NV500, NV520, NV680, NV650, NV750, NV752 series, please confirm your vacuum cleaner model before purchasing)

Compatiable Model: Replacement roller brush for Shark Vacuum LA702 LA700 LA555 AZ3002 AZ3000 AZ3000W AZ3000C AZ3002C (Please check the model number of your robot vacuum before purchasing, to avoid buying an unsuitable main brush)

Fit Model: Replacement Brush Roll Compatible for Shark Rotator Powered Lift-Away NV752 NV750 NV650 NV650W NV750AND NV652 NV652C NV750W NV752BRN NV753C NV651 NV750W NV753 Vacuums
Regular Inspections
Inspect your vacuum belt regularly. Look for signs of wear and tear, such as cracks or fraying. Checking every 3 to 6 months helps catch issues early.
Clean Your Vacuum
Keep your vacuum clean to prolong the belt’s life. Remove debris from brushes and filters. A clean vacuum operates more efficiently, reducing stress on the belt.
Manage Hair and Debris
Remove hair, string, and other debris from the brush roll. These can wrap around the belt and cause damage. Regularly cutting and pulling off tangled materials keeps the belt in good shape.
Use the Correct Belt
Use only the recommended replacement belt for your specific Shark model. Using the wrong belt may lead to poor performance or damage.
Store Properly
Store your vacuum in a cool, dry place. High humidity can affect belt integrity. Avoid areas with extreme temperatures to maintain belt flexibility.
Recognize Warning Signs
Pay attention to indicators of a worn belt. If you notice decreased suction, loud noises, or the brush roll not spinning, assess the belt immediately.
Follow Maintenance Guides
Refer to your vacuum’s maintenance manual for specific instructions. Follow the manufacturer’s guidelines on belt care to ensure optimal performance and longevity.
Implementing these tips helps maintain your Shark vacuum belt, ensuring a clean home and efficient cleaning performance.
Conclusion
Taking care of your Shark vacuum’s belt is key to keeping it running smoothly. By checking for wear and tear regularly you can avoid those frustrating moments when your vacuum just doesn’t perform like it should.
Remember to follow the maintenance tips and replace the belt when necessary. A little attention goes a long way in ensuring your vacuum stays in tip-top shape.
With a well-maintained belt your vacuum will keep your home clean and fresh for years to come. Happy cleaning!
Frequently Asked Questions
What is the purpose of the vacuum belt in a Shark vacuum?
The vacuum belt in a Shark vacuum is crucial for transferring power from the motor to the brush roll, enabling efficient dirt removal. A well-functioning belt ensures strong suction and effective cleaning performance.
How often should I check or replace the vacuum belt?
You should check or replace your Shark vacuum belt every 3 to 6 months. Regular maintenance helps ensure optimal performance and prevents decreased suction or unusual noises that indicate a worn belt.
What are the signs that my Shark vacuum belt needs attention?
Signs that your Shark vacuum belt may need attention include visible wear, loss of suction power, strange noises during operation, and ineffective cleaning. If you notice any of these issues, inspect the belt promptly.
How can I check my Shark vacuum belt for wear?
To check your Shark vacuum belt, unplug the vacuum and remove the brush roll cover. Inspect the belt for cracks, fraying, or stretching. A damaged belt should be replaced to maintain vacuum performance.
What safety measures should I take while inspecting the vacuum belt?
Always unplug the vacuum before inspecting the belt to prevent accidental activation. Use appropriate tools, keep your workspace clean, and wear protective gear if necessary to ensure a safe inspection process.
How can I maintain the Shark vacuum belt effectively?
To maintain your Shark vacuum belt, conduct regular inspections for wear, keep the vacuum clean, manage hair and debris, and store the vacuum properly. Following the manufacturer’s maintenance guidelines will also enhance belt longevity.
Can I use any replacement belt for my Shark vacuum?
It’s important to use the correct replacement belt specified for your Shark vacuum model. Using the wrong belt can lead to poor performance, potential damage, and voided warranties. Check the user manual for the right specifications.
What should I do if my vacuum is making unusual noises?
If your Shark vacuum is making unusual noises, first check the belt for wear or damage. If the belt appears fine, inspect the brush roll and hose for blockages. Addressing these issues quickly can prevent further damage.
