
Is your Shark Rotator vacuum losing suction or making strange noises? A worn-out belt might be the culprit. Instead of tossing it aside or calling for help, you can easily tackle this issue yourself. Changing the belt is a straightforward task that can save you time and money.
Key Takeaways
- Identify Symptoms: Recognize signs of a worn-out belt, such as reduced suction and strange noises, to determine if a belt replacement is needed.
- Essential Tools: Gather the necessary tools, including a screwdriver, replacement belt, pliers, work gloves, towel, and flashlight, to ensure a smooth replacement process.
- Step-by-Step Replacement: Follow a clear step-by-step guide for changing the belt on your Shark Rotator vacuum, including safely removing the old belt and installing the new one.
- Regular Maintenance: Perform regular upkeep, including checking filters, emptying the dust cup, and cleaning the brush roll, to maintain optimal vacuum performance.
- Monitor and Store Properly: Keep track of maintenance schedules and store the vacuum in a cool, dry place to extend its lifespan and efficiency.
- Use Correct Attachments: Employ the right attachments for various surfaces to enhance cleaning efficiency and safeguard the vacuum from wear and tear.
Overview of Shark Rotator Vacuum
The Shark Rotator vacuum is designed for versatile cleaning. Its lightweight design allows for easy maneuverability, making it ideal for various surfaces, including carpets and hard floors. This vacuum features strong suction power, ensuring it picks up debris effectively. The large capacity dust cup allows for extended cleaning sessions without frequent emptying.
Equipped with multiple attachments, the Shark Rotator tackles different cleaning tasks. These tools enhance capability, enabling you to clean upholstery, corners, and other challenging areas. The vacuum’s washable filters save costs on replacements while maintaining optimal performance.
For best results, regular maintenance is key. Changing the belt is crucial if you notice reduced suction or unusual noises. Understanding proper care and timely replacements helps prolong your vacuum’s life, ensuring it operates efficiently.
To help monitor your Shark Rotator’s condition, track when you last completed maintenance tasks. Regular checks and part replacements prevent bigger issues down the line. Keeping a clean vacuum enhances the overall cleaning experience.
Tools Required for Belt Replacement
To change the belt on your Shark Rotator vacuum, gather the necessary tools. This ensures a smooth and efficient process.
Recommended Products

Broad Compatibility - These Belts are compatible with Shark Rotator Professional/Power Lift-Away Upright Vacuum, Fit Models NV750W,NV752,NV752BRN,NV753C,NV650W,NV652,NV652C; NV500,NV500C,NV500CO,NV500Q,NV500W,NV500WC,NV500WTV; NV501,NV502,UV560,ZU560,ZU560C,ZU561,ZU562; NV400,NV401,NV402,NV403.

Wide Compatibility: This vacuum belt replacement compatible with Shark Rotator Pro Lift-Away Vacuum NV500 Series, fit models NV750W, NV752, NV752BRN, NV753C, NV650W, NV652, NV652C; NV500, NV500C, NV500CO, NV500Q, NV500W, NV500WC, NV500WTV; NV501, NV502, UV560, ZU560, ZU560C, ZU561, ZU562; NV400, NV401, NV402, NV403

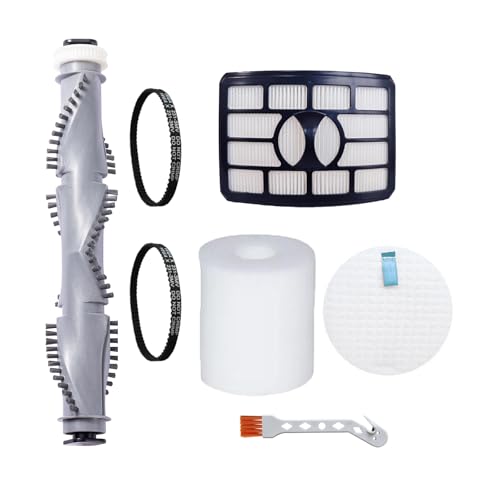
【Perfect compatibility】-- Erinice replacement brush roller belts wheels filter kit is perfect compatible with Shark rotator professional lift-away upright vacuum NV500 NV501 NV502 NV505 NV550 NV520 UV560, compare to Part XFF500 & XHF500. (Since the difference of filter, so this set only compatible with these models) (Please double check the model of your vacuum cleaner before ordering, to avoid mistake purchase!)
Essential Tools
- Screwdriver: A Phillips-head screwdriver is essential for removing screws that hold the vacuum casing.
- Replacement Belt: Always use a Shark-approved replacement belt to guarantee proper fit and performance.
- Pliers: Pliers help grip and pull any tight components when adjusting or replacing the belt.
- Work Gloves: Wearing gloves protects your hands from sharp edges and debris.
- Towel: A towel can catch any falling screws or small parts, helping to keep your workspace clean.
- Flashlight: A flashlight provides better visibility in dark areas, allowing you to see the vacuum’s inner workings clearly.
Step-by-Step Guide on How to Change the Belt on a Shark Rotator Vacuum
Changing the belt on your Shark Rotator vacuum can restore its performance. Follow these steps for a smooth process.
Recommended Products

Replace Parts Belts, Vacuum Belt Compatible with Shark Rotator Powered Lift-Away TruePet Upright Vacuum Cleaner

Complete Brush Roller Replacement Kit - The complete replacement kit helps you to make a perfect parts replacement for your vacuum cleaner, making your vacuum cleaner work as efficiently as it did in the first place.

Fit Model: Replacement Brush Roll Compatible for Shark Rotator Powered Lift-Away NV752 NV750 NV650 NV650W NV750AND NV652 NV652C NV750W NV752BRN NV753C NV651 NV750W NV753 Vacuums
Preparing the Vacuum
- Unplug your vacuum from the wall to ensure safety.
- Gather tools like a screwdriver, pliers, and a replacement belt.
- Wear work gloves to protect your hands during the process.
- Place a towel on the floor to catch any debris and protect your work surface.
Removing the Old Belt
- Locate the screws on the bottom plate of the vacuum. Use the screwdriver to remove them carefully.
- Detach the bottom plate to expose the brush roll and belt.
- Pull the brush roll out gently. This may require some wiggling.
- Locate the old belt. Slide it off the motor shaft and brush roll. Discard the worn-out belt.
Installing the New Belt
- Position the new belt over the motor shaft first.
- Loop the belt over the brush roll. Make sure it fits snugly in place.
- Ensure the belt is aligned correctly and not twisted.
- Rotate the brush roll slightly to ensure the belt is seated properly.
- Replace the brush roll back into the vacuum.
- Reattach the bottom plate and align it with the screws.
- Secure the screws tightly but avoid over-tightening them.
- Plug your vacuum back in and perform a brief test run to verify the new belt works correctly.
These steps help maintain your Shark Rotator’s performance, ensuring it runs smoothly for all your cleaning tasks.
Tips for Maintaining Your Shark Rotator Vacuum
Recommended Products

The belt Compatible with shark rotator vacuums,Fits Model:Included NV650, NV650 31, NV680, NV681, NV682, NV683, NV750, NV751, NV752, UV770 Series

【Compatible model】Attemart nv501 replacement brushroller belts wheels filter kit is perfect compatible with Shark rotator professional lift-away upright vacuum NV500 NV501 NV502 NV505 NV550 NV520 UV560, compare to Part XFF500 & XHF500. (This set only compatible with these models, so please double check the model of your vacuum before purchasing!)
Compatible with : Shark Rotator Pro Lift-Away NV500 NV501 NV502 NV503 NV505 NV510 NV520 NV550 UV560 Vacuum Cleaner
Regularly Check and Replace Filters
Filters trap dust, allergens, and debris. Inspect them once a month. Wash permanent filters with warm water and let them dry completely before reinstalling. Replace disposable filters every six months for optimal performance.
Empty the Dust Cup Frequently
A full dust cup affects performance. Empty it after each use, especially when cleaning large areas. Always ensure that the dust cup is properly clipped back into place before using the vacuum again.
Inspect and Clean the Brush Roll
Hair and debris can accumulate on the brush roll. Check it regularly for tangles. Remove any stuck debris and give the brush roll a good clean with mild soap and water.
Keep the Vacuum’s Base Clean
Dirt can build up at the base, impeding airflow. Wipe it down with a damp cloth and check for clogs in the hose or attachments. Clear any blockages you find to maintain suction power.
Store in a Cool, Dry Place
Avoid exposing your vacuum to extreme temperatures or moisture. Store it in a cool, dry location to prevent any damage and prolong its life.
Use the Right Attachments
Utilize the correct attachments for different surfaces. This approach enhances cleaning efficiency and protects your vacuum from unnecessary wear and tear.
Perform Routine Belt Checks
Belt wear can affect performance. Inspect the belt for any signs of stretch or damage. Change the belt, if necessary, to keep your vacuum running smoothly.
Implement these maintenance tips to ensure your Shark Rotator vacuum remains in optimal condition and continues to deliver powerful cleaning for years to come.
Conclusion
Changing the belt on your Shark Rotator vacuum is a simple yet essential task that can breathe new life into your cleaning routine. By keeping your vacuum in top shape you’ll ensure it performs at its best and lasts longer.
Remember to regularly check the belt along with other maintenance tips to keep everything running smoothly. A little effort goes a long way in maintaining the powerful suction and versatility that makes your Shark Rotator such a valuable tool in your home.
Happy cleaning!
Frequently Asked Questions
What are common issues with Shark Rotator vacuums?
Common issues include loss of suction, strange noises, and jams. These problems often stem from worn-out belts, dirty filters, or a clogged brush roll.
How can I fix loss of suction in my Shark Rotator?
To fix loss of suction, check for clogs in the hose and brush roll, ensure the dust cup is empty, and replace or clean the filters as needed.
How do I change the belt on a Shark Rotator vacuum?
Changing the belt is easy. First, unplug the vacuum. Remove the bottom plate, take out the old belt, and replace it with a new one following the manufacturer’s instructions.
Why should I use washable filters?
Washable filters reduce maintenance costs since you don’t have to replace them frequently. Clean them regularly to maintain optimal suction power.
How often should I check my Shark Rotator’s filters?
It’s best to check the filters every month and clean or replace them every three to six months, depending on usage.
What maintenance tips can enhance my Shark Rotator’s performance?
Regularly check and replace filters, empty the dust cup, clean the brush roll, keep the vacuum base clean, and ensure proper storage and use of attachments.
How do I store my Shark Rotator vacuum properly?
Store it in a cool, dry place, ensuring the cord is wrapped safely and the vacuum is upright to avoid any damage.
What attachments should I use for various surfaces?
Use the upholstery tool for furniture, the crevice tool for tight spaces, and the dusting brush for delicate surfaces to optimize your cleaning efficiency.
