
Ever find yourself tripping over your Dyson vacuum or struggling to find a place for it? You’re not alone. Many people face this challenge, and a cluttered space can make cleaning feel like a chore. But there’s an easy solution: hanging your Dyson vacuum can save space and keep your home organized.
Key Takeaways
- Choose the Right Dyson Model: Understand the different types of Dyson vacuums (upright, canister, cordless stick, and robot) to determine which is best suited for hanging storage.
- Preparation is Key: Gather necessary tools like a drill, screwdriver, stud finder, level, and tape measure to ensure a smooth installation process.
- Select an Ideal Location: Hang your vacuum in an accessible area near a power outlet, ensuring the wall can support its weight and is clutter-free.
- Follow Step-by-Step Installation: Use the provided mounting bracket, ensuring accurate measurements and alignment with wall studs for a secure fit.
- Regular Maintenance: Keep your Dyson vacuum in top shape by regularly cleaning the dust canister, filters, and brush bar, and monitoring battery health for optimal performance.
Understanding Dyson Vacuum Designs
Dyson vacuums come in various designs tailored to different cleaning needs. Understanding these designs helps you choose the right model for hanging storage.
Types of Dyson Vacuums
- Upright Vacuums
Upright models provide powerful suction and large dust bins. Suitable for deep cleaning carpets, these vacuums often have stiff bristles that help dislodge dirt and debris. - Canister Vacuums
Canister models feature a separate body and hose. They excel in versatility, allowing you to clean hard-to-reach areas with ease. These designs are lightweight and often include attachments for specific tasks. - Cordless Stick Vacuums
Cordless stick vacuums prioritize convenience and portability. Ideal for quick clean-ups, many models offer detachable batteries for extended use. These designs enable easy hanging, reducing clutter. - Robot Vacuums
Robot vacuums automate cleaning tasks with minimal input. They can navigate on their own and return to charging docks. While they don’t typically hang, storing them in designated areas maintains organization.
- Weight
Lightweights models allow easy maneuverability, making it simpler to hang them securely. If you plan to store your vacuum on a wall mount, choose a lightweight design. - Attachments
Various attachments enhance a vacuum’s functionality. Ensure you have adequate storage for these attachments if they’re separate from the main unit. Look for wall mounts that can accommodate these accessories. - Docking Options
Check for built-in docking features or compatible accessories. Some Dyson models include specific mounting docks designed for hanging, providing a sleek way to store your vacuum. - Battery Life
For cordless models, battery longevity influences usage. Assess how battery life aligns with your cleaning routine, factoring in the convenience of hanging the vacuum when not in use.
Preparation for Hanging Your Dyson Vacuum
Prepare your space and tools for efficient Dyson vacuum storage. Taking the right steps ensures easy access and safety.
Recommended Products

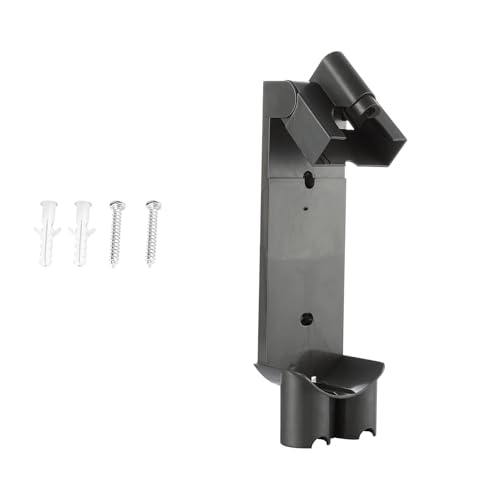
Compatibility: The vacuum wall mount holder is for Dyson V11 and V15 SV14 SV15 SV17 SV22 vacuum cleaners. Package Includes: 1* charging bracket attachment, 2* drilling screws, 2 * plastic anchors

Compatible Model: Compatible with V7 Motorhead Cord Free Vacuum, V7 Trigger Cord-Free Handheld Vacuum, V8 Animal Cord Free Vacuum, V8 Absolute Cord-Free Vacuum
Tools You Will Need
Gather these essential tools before starting the hanging process:
- Drill: Use a power drill for easy wall installation.
- Screwdriver: A flathead or Phillips screwdriver secures screws.
- Stud Finder: Locate wall studs for added stability.
- Level: Ensure the vacuum hangs straight.
- Tape Measure: Measure distances accurately for placement.
Choosing the Right Location
Select a suitable location for your Dyson vacuum. Consider these factors:
- Accessibility: Hang the vacuum in an easy-to-reach spot, preferably near a power outlet.
- Wall Type: Ensure the wall can support the weight; drywall may require additional reinforcement.
- Proximity to Charging Station: If your model is cordless, place it near the charging dock for convenience.
- Clutter-Free Area: Avoid spots with high foot traffic or obstructions to keep it accessible and safe.
By preparing effectively, you create a simple solution to keep your Dyson vacuum handy and organized.
Step-by-Step Guide on How to Hang a Dyson Vacuum
Hanging your Dyson vacuum optimizes space and keeps it accessible. Follow these steps to ensure a secure and efficient installation.
Recommended Products

Compatible with Dyson V10 Handheld Vacuum Cleaner, does not fit Dyson v11 Vacuum Cleaner
[Enhanced Compatibility] This Wall Mount exhibits impeccable Specifically designed for V7 Motorhead, V7 Trigger , V8 Animal Vacuum, and V8 Absolute Cord-Free Vacuums
Marking the Wall
- Choose the Location: Select a spot near an outlet and away from high-traffic areas.
- Measure the Height: Decide the desired height, typically about 40 inches from the ground, based on your reach.
- Use a Level: Hold a level against the area to mark a straight line.
- Identify Studs: Use a stud finder. Mark the studs; drilling into them ensures stability.
Installing the Mounting Bracket
- Gather Tools: You need a drill, screwdriver, and the mounting bracket included with your vacuum.
- Align the Bracket: Position the bracket above the marks on the wall, aligning it with the studs.
- Drill Holes: Using your drill, create holes in the marked positions.
- Secure the Bracket: Insert screws through the bracket into the drilled holes. Tighten them thoroughly to provide a secure grip.
- Position the Vacuum: Tilt the vacuum slightly while positioning it onto the bracket.
- Slide Into Place: Ensure the vacuum fully engages with the bracket so it sits securely.
- Check Stability: Gently pull down on the vacuum to confirm it’s secure. Adjust if necessary.
By following these steps, your Dyson vacuum hangs neatly and stays ready for use.
Maintenance Tips for Your Dyson Vacuum
Proper maintenance ensures your Dyson vacuum stays efficient and lasts longer. Follow these tips for a well-maintained machine.
Recommended Products

V11/V15 Filters Replacement for Dyson-Compatible with models: SV14, SV15, SV17, SV22, and SV28. Compare to part # 970013-02 & 970013-03.

Perfect Compatibility: The replacement filter is designed for v7 car + boat vacuum, v7 absolute, v7 animal, v7 animal+, v7 animal vacuum, v7 animal pro, v8 absolute, v8 absolute exclusive, v8 absolute pro, v8 animal, v8 animal+, v8 animal exclusive, v8 animal pro, v8 animal pro+, v8 carbon fiber, sv10, sv11, Replaces to part # 965661-01 & 967478-01. Not fit for V6 vacuums
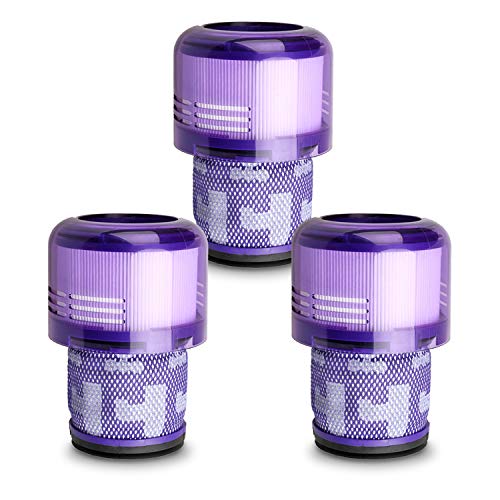
FIT MODELS – V11 V15 Filter Replacement for Dyson V11 Origin Cordless Vacuum (B00FZPRUTY, B0C2J7R8PY) V11 Animal V11 Torque Drive+ V11 Complete V11 Extra V11 Absolute V15 Detect (B0CFRH6NF2, B0CT97D9R2, B0C2J8KJH9) V15s Detect Submarine Vacuums. Compatible with Dyson filter replacement model numbers: Graded SV14, SV15, SV17, SV22, SV28, SV47. Please verify your vacuum model before purchasing to ensure a perfect fit.
Regular Cleaning and Care
Clean your Dyson vacuum regularly. Start by emptying the dust canister after each use. Rinse it with water and let it dry completely before reattaching. Check and clean the filters every month. Depending on your model, you may have either washable or non-washable filters. If your model has washable filters, rinse them under cold water, letting them dry for 24 hours before use. Inspect the brush bar for hair and debris every few uses. Remove any buildup with scissors or a cleaning tool. Keeping these parts clean ensures optimal performance and longevity.
Checking for Battery Health
Monitor your Dyson vacuum’s battery health. Charge the battery fully before using it. Watch for diminishing runtime or performance; this indicates a potential need for a new battery. Use the Dyson app, if available, for insights into battery status and performance alerts. If the vacuum experiences frequent cuts in power during use, check for proper connection to the charger. Problems with charging or battery life may require professional assistance or a battery replacement.
Conclusion
Hanging your Dyson vacuum not only saves space but also keeps it ready for action whenever you need it. By following the steps outlined and maintaining your vacuum regularly you’ll enjoy a more organized cleaning routine. Remember to check the battery health and keep those filters clean to ensure your vacuum runs at its best. With a little effort your Dyson will always be within reach and ready to tackle any mess that comes your way. Happy cleaning!
Frequently Asked Questions
How can I efficiently store my Dyson vacuum?
Hanging your Dyson vacuum is an efficient storage solution that prevents clutter and makes cleaning easier. This method allows you to maximize your space while keeping your vacuum readily accessible for your cleaning needs.
What factors should I consider for different Dyson vacuum designs?
When choosing a Dyson vacuum, consider factors like weight, type of attachments, docking options, and battery life. These elements cater to various cleaning needs and help determine the best vacuum for your home and lifestyle.
What is the step-by-step process to hang my Dyson vacuum?
To hang your Dyson vacuum, choose a suitable location, mark the wall, find the studs, install the mounting bracket securely, position the vacuum onto the bracket, and ensure it is stable. This method helps save space and keeps your vacuum in good condition.
How can I maintain my Dyson vacuum for optimal performance?
Regular maintenance includes cleaning the dust canister, filters, and brush bar. Check the battery health, charge it fully, and watch for reduced runtime. These steps will help ensure your Dyson vacuum operates efficiently and lasts longer.
When should I replace my Dyson vacuum’s battery?
You should consider replacing your Dyson vacuum’s battery if you notice a significant decrease in runtime or performance. Regularly monitoring the battery health will help you determine the right time for a replacement, ensuring consistent cleaning power.
