
Is your Dyson handheld vacuum losing its suction power? You’re not alone. Many people find that after a few months of use, their trusty vacuum doesn’t perform quite like it used to. Dust and debris can build up quickly, making it less effective and more frustrating to use.
Key Takeaways
- Understand Key Components: Familiarize yourself with the motor, filter, dust bin, and attachments to maintain your Dyson handheld vacuum effectively.
- Regular Maintenance: Clean the filter and empty the dust bin weekly to prevent loss of suction and ensure optimal performance.
- Use Essential Tools: Equip yourself with soft cloths, brushes, water, and scissors for effective vacuum cleaning and maintenance.
- Step-by-Step Cleaning: Follow a systematic process for disassembling, cleaning the dust container, filter, and brush bar to maximize efficiency.
- Inspect and Charge: Regularly check for visible damage and maintain battery health by charging the vacuum after each use.
Understanding Your Dyson Handheld Vacuum
Dyson handheld vacuums are designed for versatility and performance. Understanding their components and features helps maintain optimal function.
Key Components
- Motor: The heart of the vacuum, providing suction power. A clean motor enhances efficiency.
- Filter: Traps dust and allergens, protecting the motor. Regular cleaning or replacement is essential.
- Dust Bin: Collects debris. Empty the bin frequently to prevent clogs and maintain suction.
- Attachments: Various tools help clean different surfaces. Use the right attachment for improved results.
Common Issues
Familiarizing yourself with common problems can streamline maintenance:
- Loss of Suction: Often caused by a clogged filter or full dust bin. Regularly check and clean both.
- Battery Life: Consider the battery’s condition. A deteriorating battery affects performance.
- Brush Bar: Hair and debris can wrap around the brush. Clean it regularly to sustain effective cleaning.
Performance Tips
Maximize your vacuum’s performance with these tips:
- Frequent Cleaning: Clean the filter and empty the dust bin weekly.
- Proper Charging: Charge your vacuum fully for maximum battery life.
- Attachment Use: Use appropriate tools for each task to ensure comprehensive cleaning.
Understanding these aspects helps you clean effectively and extends your vacuum’s lifespan. Keeping your Dyson handheld vacuum in top shape enhances your cleaning experience.
Essential Cleaning Tools
Cleaning your Dyson handheld vacuum requires a few essential tools. Knowing what to gather simplifies the task and ensures effective maintenance.
Recommended Products

Home Essentials: Holikme dryer vent cleaner kit can easily help you to remove years of built up lint from your dryer vent, making your appliance runs more efficiently and securely; Suitable for most dryer types, please kindly check our product size information for reference in order to better shopping experience

[COMPATIBLE WITH DYSON]: This sets compatibles nicely with the vacuum you are using. The adapter can compatible with Dy son V7 V8 V10 V11 V12 V15 etc cordless vacuum cleaner. We have upgraded and designed this patented product, the Dryer Vent Cleaner Kit, to work well with the hoover you are using. Note: Cannot be used with electrically driven tools or floors heads or other brand vacuum cleaner

Application - This item is a customized tool kit made for Dyson V6, V7, V8, V10, V11 and V15 vacuum cleaners. You can easily disassemble all the vacuum cleaner models above with this kit.
Recommended Cleaning Supplies
- Soft Cloths – Use microfiber cloths to prevent scratches on surfaces. These are great for wiping down the vacuum’s exterior.
- Brushes – A small brush, like a soft-bristled toothbrush, helps remove debris from the filter and brush bar. Keep one handy for detailed cleaning.
- Water – Use clean, lukewarm water for rinsing the filter and dust bin. Avoid harsh chemicals that could damage the vacuum’s components.
- Container – Have a bowl or container for holding small parts while you clean. This keeps everything organized and prevents loss.
- Scissors – Use scissors for cutting away hair or threads tangled in the brush bar. Regular maintenance keeps the brush functioning effectively.
- Unplug the Vacuum – Always disconnect the vacuum from the charger before cleaning it. This prevents accidental activation.
- Check for Damage – Inspect the vacuum for any visible damage before cleaning. Addressing issues like frayed cords can prevent accidents.
- Avoid Water Contact – Keep water away from electrical components. Wipe surfaces carefully to protect wiring and motors.
- Wear Gloves – Consider wearing gloves while cleaning to protect your hands from dust and debris.
- Ventilate the Area – Ensure good ventilation while cleaning. This reduces inhalation of any dust particles.
Step-by-Step Cleaning Process
Cleaning your Dyson handheld vacuum involves several straightforward steps. Follow this process to maintain optimal performance.
Recommended Products

Widely Compatible with Dyson Popular Series: Whekeosh pre-filter replacement is compatible with Dyson V8 Series/ V7 Series/ V6 Series/ DC59 Series/ DC58. Replaces Part 965661-01.For more details refer to the product picture or consult us.

V11 FILTER: Improvedhand V11 filter are made of high-strength and healthy material to ensure best performance and a healthy lifestyle, helpful for keeping your house truly tidy and improving the air quality at home
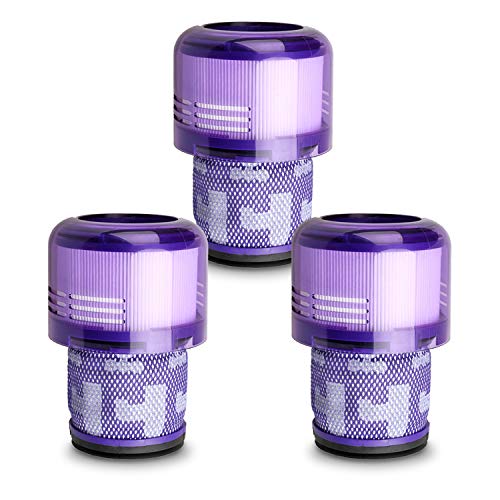
FIT MODELS – V11 V15 Filter Replacement for Dyson V11 Origin Cordless Vacuum (B00FZPRUTY, B0C2J7R8PY) V11 Animal V11 Torque Drive+ V11 Complete V11 Extra V11 Absolute V15 Detect (B0CFRH6NF2, B0CT97D9R2, B0C2J8KJH9) V15s Detect Submarine Vacuums. Compatible with Dyson filter replacement model numbers: Graded SV14, SV15, SV17, SV22, SV28, SV47. Please verify your vacuum model before purchasing to ensure a perfect fit.
Disassembling Your Vacuum
- Unplug your vacuum before starting any disassembly to ensure safety.
- Remove the dust container by pressing the release button and pulling it away from the main unit.
- Detach any attachments such as the crevice tool or brush by pulling them off their slots.
Cleaning the Dust Container
- Empty the dust container into a trash bin after detaching it from the vacuum.
- Rinse it under warm water, ensuring you remove all dirt and debris. Avoid using detergents.
- Let it dry completely—this may take several hours—before reattaching it to the vacuum.
Washing the Filter
- Locate the filter—typically found near the dust container.
- Remove the filter by twisting it counterclockwise.
- Wash the filter under cold water until the water runs clear. Do not use soaps or chemicals.
- Allow it to air dry for at least 24 hours before placing it back in the vacuum.
Cleaning the Brush Bar
- Inspect the brush bar for hair or debris wrapped around it.
- Use scissors to cut away any tangled hair, being careful not to damage the bristles.
- Wipe the brush bar with a damp cloth to remove any remaining dust or dirt.
- Reinsert the filter once it’s completely dry by twisting it back into place.
- Attach the dust container by aligning it with the body and pushing until it clicks into place.
- Reattach any tools or brushes to their designated slots, ensuring everything is secure.
Following this cleaning process keeps your Dyson handheld vacuum functioning at its best. Regular maintenance prevents loss of suction and extends the life of your device.
Maintenance Tips for Longevity
Maintaining your Dyson handheld vacuum boosts its performance and extends its lifespan. Follow these practical tips for optimal care:
Recommended Products

[Stretch Universal Connector] PetOde dryer lint vacuum cleaner attachment is designed with a premium elasticated stretch universal connector that can be connected to most vacuum cleaners! Say goodbye to the worry of purchasing incompatible attachment models

The most powerful handheld vacuum.¹

Perfect Compatibility: The replacement filter is designed for v7 car + boat vacuum, v7 absolute, v7 animal, v7 animal+, v7 animal vacuum, v7 animal pro, v8 absolute, v8 absolute exclusive, v8 absolute pro, v8 animal, v8 animal+, v8 animal exclusive, v8 animal pro, v8 animal pro+, v8 carbon fiber, sv10, sv11, Replaces to part # 965661-01 & 967478-01. Not fit for V6 vacuums
Keep the Dust Bin Clean
- Empty the dust bin regularly. After each use, ensure the bin isn’t full, as excessive debris can hinder suction.
- Clean the bin using warm soapy water. Rinse it thoroughly and let it dry completely before reattaching.
Clean the Filter
- Wash the filter every month. Remove it and rinse it under cold water until the water runs clear. Avoid using detergent.
- Allow the filter to dry for 24 hours before reinserting it.
Check the Brush Bar
- Inspect the brush bar for hair and debris. Use scissors to cut away tangled strands.
- Clean the brush bar every few weeks, depending on usage.
Ensure Battery Health
- Charge the battery after each use. A full charge helps maintain battery health.
- Avoid letting the battery completely drain. This practice contributes to a longer battery life.
Store Properly
- Store the vacuum in a dry area. Humidity can damage electrical components.
- Avoid placing heavy items on top of the vacuum to prevent physical damage.
- Perform a thorough check every three to six months. Inspect all components for wear or damage.
- Replace parts as needed. Using authentic Dyson parts ensures compatibility and performance.
By following these maintenance tips, you create a consistent cleaning routine that enhances your vacuum’s efficiency and longevity.
Conclusion
Keeping your Dyson handheld vacuum in top shape is easier than you might think. With a little regular maintenance and attention to its components you can enjoy powerful suction and a longer lifespan.
Make it a habit to clean the dust bin and filter frequently and check the brush bar for any clogs. Proper storage and charging will also do wonders for your vacuum’s battery life.
By following these simple steps you’ll keep your vacuum performing at its best and make your cleaning routine a breeze. Happy cleaning!
Frequently Asked Questions
How can I prevent suction power loss in my Dyson handheld vacuum?
To prevent suction power loss, regularly clean the dust bin and filter. Ensure the brush bar is free of hair and debris, and check for clogs in the hose or nozzle. Keeping the vacuum well-maintained allows it to perform optimally.
What should I do if my Dyson vacuum battery life is short?
If your battery life is short, ensure that you’re charging it fully and storing it at room temperature. Clean the battery terminals and avoid overcharging. If issues persist, consider replacing the battery.
How often should I clean my Dyson handheld vacuum?
It’s recommended to clean your Dyson handheld vacuum at least once a month. Regularly check the dust bin, filter, and brush bar for debris to maintain peak performance.
What are the steps for proper storage of my Dyson vacuum?
Store your Dyson vacuum in a cool, dry place. Ensure it’s fully charged before storage and avoid storing it in damp areas. Keeping it upright can also prevent damage.
How can I extend the lifespan of my Dyson handheld vacuum?
To extend your vacuum’s lifespan, follow a consistent cleaning routine, regularly check components, maintain battery health, and ensure proper storage. Regular inspections are key to catching potential issues early.
