
Have you ever felt your brakes get spongy or unresponsive? It’s a common issue that can leave you feeling uneasy behind the wheel. One effective solution is using a vacuum bleeder, which makes the process of bleeding your brakes easier and more efficient.
Key Takeaways
- Understanding Vacuum Bleeders: These tools simplify the brake bleeding process by creating suction to remove air and old brake fluid, enhancing vehicle safety and performance.
- Essential Tools Required: Gather necessary tools including a vacuum bleeder, brake fluid, wrenches, clear tubing, catch container, gloves, and safety goggles before starting the process.
- Follow a Step-by-Step Method: To effectively use a vacuum bleeder, prepare your tools, connect the device correctly, create suction, and monitor fluid flow, ensuring you close the valve at the right moment.
- Avoid Common Mistakes: Regularly check fluid levels, use the correct brake fluid type, and inspect equipment for leaks or damage to prevent air from re-entering the system.
- Safety First: Work in a well-ventilated area, wear personal protective equipment, and ensure the vehicle is secure while maintaining a clean workspace to avoid accidents.
- Routine Maintenance: After use, clean and inspect your vacuum bleeder regularly to maintain its effectiveness and longevity, ensuring it operates correctly for future brake bleeding tasks.
Understanding Vacuum Bleeders
Vacuum bleeders simplify the brake bleeding process, helping you maintain your vehicle’s braking system effectively. These tools create suction, drawing air and old brake fluid out of the brake lines.
What Is a Vacuum Bleeder?
A vacuum bleeder is a device designed for removing air from brake lines. It typically consists of a vacuum pump, a reservoir to collect fluid, and various fittings for connecting to brake bleed screws. These devices come in manual or powered versions, offering flexibility for users. With a vacuum bleeder, you achieve a thorough brake bleeding without the traditional pump-and-hold method.
How Does It Work?
A vacuum bleeder operates by generating suction through the vacuum pump. You connect the tool to the brake line at the bleed screw. Once activated, the tool pulls brake fluid from the reservoir through the line, simultaneously removing trapped air. Here’s a quick step-by-step process:
- Prepare Your Tools: Gather your vacuum bleeder, a wrench, a clean container, and new brake fluid.
- Connect the Vacuum Bleeder: Attach the vacuum bleeder to the bleed screw of the brake caliper or wheel cylinder.
- Create Suction: Start the vacuum bleeder to create suction. This step helps draw fluid through the line and out of the bleed screw.
- Monitor Fluid Levels: Keep an eye on the fluid reservoir. Ensure you add fresh brake fluid as needed to avoid introducing air.
- Close the Bleed Screw: Once the fluid runs clear and bubbles stop, close the bleed screw while the vacuum is still applied.
This method ensures an efficient and cleaner way to bleed your brakes, reducing the risk of air pockets that may lead to spongy brakes.
Preparing for Brake Bleeding
Preparing for brake bleeding is essential for an efficient process. Gather the necessary tools and ensure safety before starting.
Recommended Products
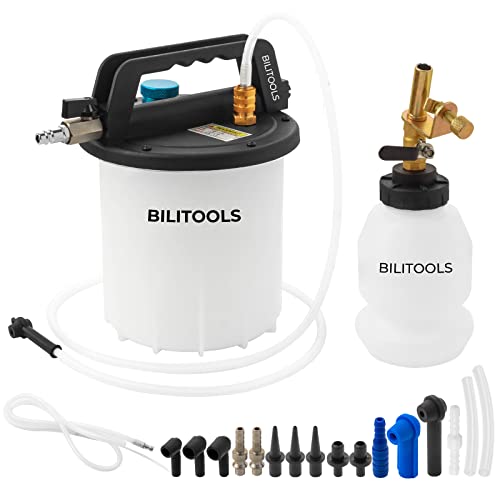
【One-Person Brake Bleeding Made Easy】 Connects to air compressor to let you bleed brakes or clutch lines on your own—no need for a helper or repeated pedal pumping. Operates at 70–170 PSI (4.8–11.6 bar) for stable, professional results.

Brake booster kit comes with a vacuum gauge that can be widely used to test vehicle vacuum systems/as a vacuum sealer. Equipped with a vacuum gauge to help you take accurate readings. Pressure range: 0-30 in/Hg, 0-760 mm/Hg

【One-Person Brake Bleeding Made Easy】 Connects to air compressor to let you bleed brakes or clutch lines on your own—no need for a helper or repeated pedal pumping. Operates at 87–170 PSI (6–12 bar) for stable, professional results.
Required Tools and Materials
- Vacuum Bleeder: This tool creates suction to remove air and old fluid, essential for effective bleeding.
- Brake Fluid: Use the type specified in your vehicle’s service manual, typically DOT 3, DOT 4, or DOT 5.1.
- Wrenches: A wrench set helps you open brake bleeder valves, usually 8mm or 10mm in size.
- Clear Tubing: Connect it to the bleeder valve to direct fluid into a container, allowing you to monitor air removal.
- Catch Container: This container collects the old brake fluid, preventing spills and keeping your workspace clean.
- Safety Goggles: Protect your eyes from brake fluid, which can cause irritation or damage.
- Gloves: Wearing gloves protects your hands from harmful chemicals in brake fluid.
- Work in a Well-Ventilated Area: Ensure proper airflow to avoid inhaling fumes from brake fluid.
- Keep Brake Fluid Away from Paint: Brake fluid is corrosive to paint. Use a catch container to minimize spills.
- Use Proper Personal Protective Equipment: Wear gloves and safety goggles to protect your skin and eyes.
- Maintain a Clean Workspace: A tidy workspace minimizes accidents and makes it easier to locate tools and materials.
- Ensure the Vehicle is Secure: Use jack stands to stabilize the vehicle when working underneath. Avoid relying solely on a jack for support.
- Follow Manufacturer Instructions: Always reference your vehicle’s manual to adhere to specific safety guidelines and procedures related to brake maintenance.
Step-by-Step Guide to Using a Vacuum Bleeder on Brakes
Using a vacuum bleeder streamlines the brake bleeding process. Follow these steps for effective use.
Recommended Products

YOUR TRIP COMPANION: With Orion Motor Tech's brake bleeder kit, say goodbye to the old days when it takes two or more to bleed brakes and pump out fluids; thanks to the well-designed handheld vacuum pump and clear instructions, brake bleeding of each wheel only takes one less than 5 minutes with great ease
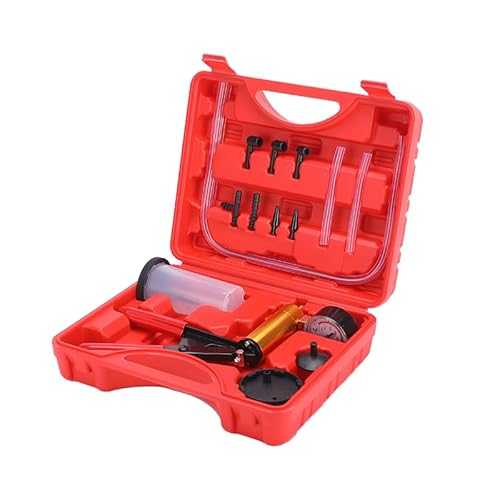
Versatile: Hand vacuum pump kit comes with a vacuum gauge to help you take accurate readings. Pressure range: 0-30 inches Hg, 0-760 mmHg. It includes accessories for brake bleeding and automotive diagnostics. The vacuum pump kit can test and diagnose a variety of parts and general systems on bikes motorcycles trucks pickups or any other vehicle.
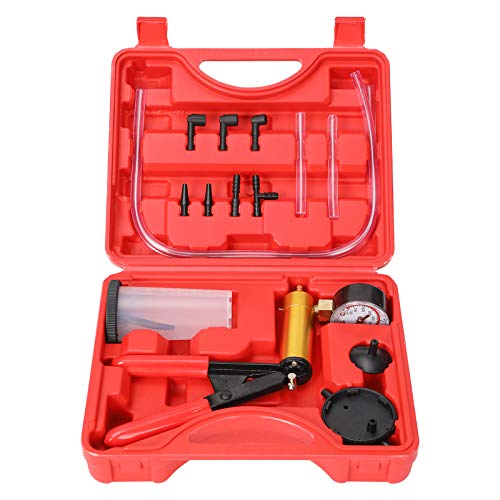
Multi-Functional Professional Testing Kit:The handheld vacuum pump kit with a vacuum pressure gauge enables precise pressure readings, covering a measurement range of 0-30 inches Hg (0-760 mmHg). Equipped with accessories for brake bleeding and automotive diagnostics, it is suitable for testing and diagnosing components and systems of bikes, motorcycles, trucks, pickups, and various vehicles, meeting professional needs in multiple scenarios.
Connecting the Vacuum Bleeder
- Gather Equipment: Collect your vacuum bleeder, brake fluid, clear tubing, and a catch container.
- Locate Brake Bleeder Valve: Find the bleeder valve on each brake caliper or wheel cylinder.
- Attach Tubing: Connect one end of the clear tubing to the bleeder valve and place the other end in the catch container.
- Connect Vacuum Pump: Attach the vacuum pump to the reservoir of the bleeder. Ensure all connections are secure to avoid leaks.
Starting the Bleeding Process
- Check Fluid Level: Ensure the brake fluid reservoir in your vehicle is filled to the recommended level.
- Create Vacuum: Pump the vacuum bleeder to create suction. Most models have a gauge; target the recommended vacuum pressure stated in the manual.
- Open Bleeder Valve: Using a wrench, loosen the bleeder valve. Do this slowly to prevent splattering.
- Watch Fluid Flow: Observe the fluid flowing through the tubing. Look for air bubbles in the fluid; this indicates that air is escaping from the brake line.
- Close the Valve: Once the fluid runs clear without bubbles, close the bleeder valve securely while keeping the vacuum pump running to maintain suction.
- Check Reservoir Frequently: Maintain an eye on the brake fluid reservoir. Refill it as necessary to prevent drawing air into the system.
- Monitor Fluid in Tubing: Ensure fluid levels in the catch container remain steady. If the level drops too low, it may introduce air back into the system.
- Repeat for All Brakes: Follow the same process for each wheel. Start with the brake furthest from the master cylinder, then work your way closer.
By following these steps, you’ll ensure a thorough brake bleeding process, enhancing brake performance and safety.
Tips for Effective Brake Bleeding
Brake bleeding requires attention to detail for optimal results. Follow these guidelines to ensure a smooth and effective process.
Common Mistakes to Avoid
- Neglecting to Check Fluid Levels: Regularly monitor your brake fluid levels during the bleeding process. Low fluid can lead to air re-entering the system.
- Using the Wrong Brake Fluid: Ensure you use the correct type of brake fluid as specified by your vehicle’s manufacturer. Incorrect fluid can damage components.
- Skipping the Pre-Bleeding Check: Before starting, inspect hoses and connections for leaks or damage. This ensures a proper seal and prevents air from entering.
- Over-pressurizing the Bleeder: Keep the vacuum bleeder at recommended levels. Excessive pressure can cause fluid to boil, creating air bubbles.
- Clean Regularly: After each use, clean the vacuum bleeder to prevent contamination. Residual fluid can affect performance in future uses.
- Inspect Seals and Gaskets: Check seals and gaskets before each use for wear or damage. Replacing them ensures a tight seal and proper vacuum operation.
- Store Properly: Keep the vacuum bleeder in a dry, cool place to avoid damage. Prolonged exposure to moisture can deteriorate components.
- Test Functionality: Regularly test the vacuum bleeder to ensure it operates correctly. This can save time and frustration during your next brake bleeding.
Conclusion
Using a vacuum bleeder can make the brake bleeding process much easier and more efficient. By following the steps and tips outlined, you can ensure your brakes perform at their best. Remember to keep an eye on fluid levels and inspect for any leaks during the process.
Regular maintenance and proper care of your bleeder will go a long way in keeping your brakes safe and responsive. With a little practice you’ll find that tackling brake issues becomes a breeze. Happy bleeding and drive safely!
Frequently Asked Questions
What causes spongy brakes?
Spongy brakes typically occur due to air trapped in the brake lines or low brake fluid levels. This can lead to reduced brake responsiveness. It’s essential to troubleshoot and address these issues promptly for safe driving.
How does a vacuum bleeder work?
A vacuum bleeder uses suction to remove air and old brake fluid from the brake lines. By creating a vacuum, it helps draw fluid from the reservoir and airflow out of the lines, making brake bleeding easier and more efficient.
What safety measures should I take when bleeding brakes?
Always wear safety goggles and gloves. Ensure your vehicle is on a flat surface and securely supported with jack stands. Also, keep a fire extinguisher nearby, and avoid spilling brake fluid, which can damage paint and surfaces.
How often should I bleed my brakes?
Bleeding your brakes should be done every 1-2 years or if you experience brake issues such as spongy brakes or after replacing brake components. Regular maintenance ensures optimal brake performance and safety.
Can I use any brake fluid?
No, you must use the correct type of brake fluid specified by your vehicle’s manufacturer. Different brake fluid types (like DOT 3, DOT 4, or DOT 5) have varying properties, and using the wrong type can lead to brake failure.
Why is monitoring fluid levels important?
Monitoring fluid levels is crucial because low brake fluid can introduce air into the brake lines, causing spongy brakes. Maintaining proper fluid levels ensures your brake system functions efficiently and safely.
How can I inspect for leaks when bleeding brakes?
Inspect for leaks by checking brake lines, connections, and the master cylinder for any signs of brake fluid. It’s vital to fix any leaks before proceeding with brake bleeding to ensure system integrity.
What should I do if my vacuum bleeder is over-pressurized?
If your vacuum bleeder is over-pressurized, stop the bleeding process immediately. Release the pressure by carefully loosening the bleeder valve, and ensure all connections are secure without leaks to prevent future issues.
How do I maintain my vacuum bleeder?
To maintain your vacuum bleeder, regularly clean the equipment after use, check seals and gaskets for wear, and store it in a dry place. Periodically test its functionality to ensure it remains in good working condition.
Why is regular functionality testing important?
Regular functionality testing is essential to ensure your vacuum bleeder works effectively every time you need it. This helps prevent issues during use and ensures safe, efficient bleeding of your brake system when needed.
