
Key Takeaways
- Importance of Cleaning: Regularly cleaning your kitchen faucet aerator enhances water flow, improves water quality, and prolongs the lifespan of your faucet.
- Enhanced Water Flow: A clean aerator significantly improves water pressure, making daily tasks like washing dishes more efficient.
- Better Water Quality: Cleaning prevents mineral buildup, reducing the risk of contaminants in your drinking water.
- Water Conservation: An efficient aerator reduces water usage, helping you save money and contributing to environmental sustainability.
- Simple Maintenance: Cleaning the aerator involves minimal tools and is easy to incorporate into your regular household chores.
- Regular Cleaning Frequency: Aim to clean your aerator every 3 to 6 months, or sooner if you notice reduced water flow or visible buildup.
Have you ever noticed a weak water flow from your kitchen faucet? It can be frustrating when you’re trying to wash dishes or fill a pot. Often, the culprit is a clogged aerator. This small device at the end of your faucet helps regulate water flow and can easily get blocked by mineral buildup and debris.
Importance Of Cleaning Faucet Aerators
Cleaning faucet aerators plays a crucial role in maintaining optimal water flow and quality in your kitchen. Regular cleaning can enhance water pressure, reduce waste, and prolong the life of your faucet.
Improved Water Flow
You’ll notice a significant improvement in water flow after cleaning your aerator. A clogged aerator restricts water flow and creates frustration during daily tasks, like washing dishes or filling pots. By clearing the debris, you restore the efficient flow of water.
Better Water Quality
Cleaning aerators ensures your water remains clean and safe. Mineral buildup and debris can harbor bacteria and other contaminants. By regularly cleaning the aerator, you minimize the risk of impurities in your drinking water.
Increased Faucet Lifespan
A clean aerator can extend the life of your faucet. When debris accumulates, it can cause wear and tear on the faucet’s components. Regular cleaning prevents damage and promotes the smooth operation of your kitchen faucet.
Water Conservation
A clean aerator can aid in water conservation. When water flows efficiently, you use less water for everyday tasks. This not only saves you money on your water bill but also contributes to environmental sustainability.
Easy Maintenance
Cleaning a faucet aerator is a simple task that requires minimal tools. With just a few steps, you can keep your aerator in top shape. You’ll find it easy to incorporate this maintenance routine into your household chores.
By prioritizing the cleaning of your faucet aerators, you enjoy a better kitchen experience with enhanced water flow, quality, and conservation.
Tools Needed For Cleaning
Cleaning your kitchen faucet aerator requires a few essential tools. These tools make the process straightforward and efficient.
Recommended Products
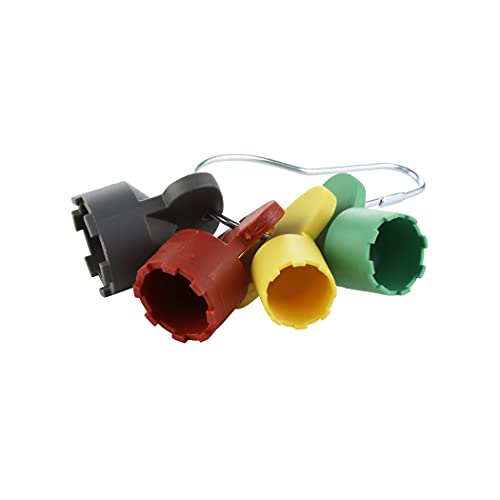
FAUCET AERATOR REMOVAL TOOL: Includes 4 different color coded keys to remove hidden faucet aerators
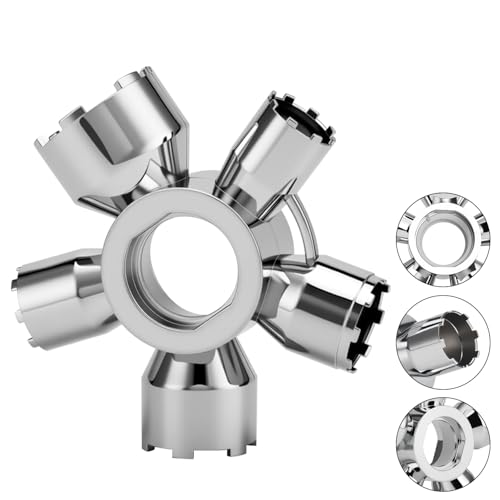
Multi-Size Heavy-Duty Design for Versatile Aerator Removal:Our 10-in-1 tool is tailored to fit 7 concealed threaded aerator sizes (TF, M16.5, M18.5, M21.5, M24, SLIM AIR M24), 2 cut-edge housing sizes (M24, M28), and 1 round housing size (M22). Compatible with most aerators on the market, it turns tedious maintenance into a quick, hassle-free task.

Complete Faucet Aerator Set – 36 Pieces: Includes 10×M16.5mm, 8×M18.5mm, 10×M21.5mm, and 8×M24mm faucet aerators, compatible with most kitchen and bathroom faucets. Ideal for fixing low water flow and improving water stream, and improving the water stream. Perfect as a sink aerator replacement kit.
Essential Cleaning Supplies
- Bowl or bucket: Use it to catch any dripping water while you remove the aerator.
- Adjustable wrench: This tool helps you unscrew the aerator without damaging it.
- Old toothbrush or soft brush: Utilize this for scrubbing mineral deposits and debris off the aerator.
- White vinegar: This solution effectively dissolves mineral buildup. Soak the aerator in it for optimal results.
- Cloth or paper towels: Use these to dry the aerator and surrounding areas after cleaning.
Optional Tools for Efficient Cleaning
- Pliers: These provide extra grip if the aerator is stuck. Ensure you wrap the aerator in a cloth to prevent scratches.
- Small container: Use this for soaking small parts of the aerator in vinegar.
- Baking soda: Mixing this with vinegar can boost cleaning power for heavy deposits.
- Protective gloves: Consider wearing these to keep your hands dry and clean during the process.
Gather these tools before you start, and you’ll have everything at hand for a smooth cleaning experience.
Step-by-Step Guide On How To Clean Aerator On Kitchen Faucet
Cleaning the aerator on your kitchen faucet is a straightforward process that enhances water flow and quality. Follow these steps to restore your faucet’s efficiency.
Removing The Aerator
- Gather Your Tools: Collect an adjustable wrench or pliers and a bowl or bucket to catch water.
- Check for a Locking Mechanism: Examine the aerator for any locking screws and remove them if present.
- Unscrew the Aerator: Grip the aerator firmly with your hand. Use the adjustable wrench for extra torque if it’s stuck. Turn it counterclockwise to unscrew it completely.
- Place in a Bowl: Once detached, place the aerator in your bowl or bucket to avoid spills.
Cleaning The Aerator
- Inspect the Parts: Look for mineral buildup or debris inside the aerator’s screen and housing.
- Soak in Vinegar: Fill a small container with white vinegar and submerge the aerator parts for about 30 minutes. This helps dissolve stubborn minerals.
- Scrub with a Brush: Use an old toothbrush to scrub any remaining buildup after soaking. Focus on the screen and threaded sections.
- Rinse Thoroughly: Rinse all parts under clean water to remove vinegar and loosened debris. Ensure there’s no leftover residue.
Reinstalling The Aerator
- Check for Damage: Before reassembly, inspect the aerator and washer for any damage. Replace any worn parts to maintain a secure seal.
- Screw Back on: Position the aerator back onto the faucet. Use your hand to twist it clockwise until it’s snug.
- Tighten if Necessary: Use the adjustable wrench for additional tightening, but avoid overtightening to prevent damage.
- Test the Faucet: Turn on the faucet to check for leaks and ensure the water flows smoothly.
Following these steps regularly maintains your kitchen faucet’s performance and prolongs its lifespan.
Tips For Maintaining Faucet Aerators
Keeping your faucet aerators clean ensures optimal water flow and efficiency. Regular maintenance prevents common issues caused by mineral buildup and debris.
Frequency Of Cleaning
Clean your faucet aerator every 3 to 6 months. This timeline helps prevent significant clogs. If you notice reduced water pressure or visible buildup, clean it sooner. In high mineral content areas, consider cleaning every month.
Signs That Your Aerator Needs Attention
- Reduced water flow: If water flows slowly, it likely indicates blockage.
- Noise: Unusual sounds during water flow might suggest aerator problems.
- Visible buildup: Lime or mineral deposits on the aerator surface are definite signs.
- Inconsistent spray patterns: If water sprays unevenly, clean the aerator to restore proper function.
Conclusion
Cleaning your kitchen faucet aerator is a quick and rewarding task that can make a big difference in your daily routine. By taking just a little time to maintain it, you’ll enjoy better water flow and improved quality. Plus, you’ll help extend the life of your faucet while saving money on your water bill.
Remember to keep an eye out for signs that your aerator needs attention and don’t hesitate to give it a good clean every few months. With these simple steps, you can ensure your kitchen faucet remains in top shape and ready to tackle any task. Happy cleaning!
Frequently Asked Questions
What causes weak water flow from kitchen faucets?
Weak water flow is often caused by a clogged aerator, which can become obstructed by mineral buildup and debris. This affects water flow and can frustrate tasks like washing dishes.
How can I improve water flow in my kitchen faucet?
To improve water flow, regularly clean the aerator. This process eliminates mineral deposits and debris, enhancing water flow and quality while also extending the faucet’s lifespan.
What tools do I need to clean a faucet aerator?
Essential tools include a bowl or bucket, an adjustable wrench, an old toothbrush, white vinegar, and cloths. Optional tools like pliers and baking soda can enhance the cleaning process.
How often should I clean my faucet aerator?
Clean your faucet aerator every 3 to 6 months or sooner if you notice reduced water pressure or visible buildup. Regular maintenance ensures optimal performance.
What are the signs that my aerator needs cleaning?
Look for reduced water flow, unusual noises, visible mineral deposits, or inconsistent spray patterns. These are indicators that your aerator may need immediate attention.
