
Ever wondered what lurks under your fridge? It’s easy to forget this often-overlooked space, but dust bunnies and crumbs can build up quickly. Not only can this be a breeding ground for pests, but it can also affect your fridge’s efficiency.
Key Takeaways
- Regular Cleaning is Essential: Aim to vacuum under your fridge at least every six months to prevent dust buildup and maintain appliance efficiency.
- Pest Prevention: Cleaning beneath the fridge helps eliminate potential breeding Grounds for pests, reducing the risk of infestations and related health issues.
- Necessary Tools: Equip yourself with the right tools, like vacuum cleaners, microfiber cloths, and a mild cleaner, to effectively clean under the fridge.
- Step-by-Step Process: Follow a structured approach—prepare the area, safely move the fridge, vacuum thoroughly, and wipe down surfaces for a comprehensive clean.
- Ongoing Maintenance Tips: Maintain a clear area around your fridge, regularly inspect for spills or leaks, and clean condenser coils to prolong your fridge’s lifespan and efficiency.
- Improve Air Quality: Keeping the area beneath the fridge clean not only enhances appliance performance but also improves indoor air quality by reducing allergens.
Importance Of Cleaning Under The Fridge
Cleaning under your fridge plays a crucial role in maintaining a healthy home environment. Regular cleaning prevents dust and debris buildup that can lead to pest infestations. Pests like rodents and insects can find food and shelter in those hidden areas, increasing the risk of disease spread in your home.
Moreover, dirt and dust can affect your fridge’s efficiency. Accumulated particles can hinder airflow, making your fridge work harder to maintain a cool temperature. Over time, this extra strain can lead to increased energy bills and shorten the life of your appliance.
Cleaning under your fridge can also improve indoor air quality. Dust particles can circulate throughout your home, contributing to allergies and respiratory issues. Keeping this area clean helps reduce allergens, creating a healthier living space for you and your family.
To maintain your fridge in top condition, aim to clean under it at least every six months. Regular maintenance ensures optimal performance and a tidy environment. You’ll notice a difference in appliance efficiency and a reduction in unwanted pests when you prioritize this simple task.
Tools You Will Need
Cleaning under your fridge requires specific tools to make the job efficient and effective. Gather the following items before starting.
Recommended Products

Home Essentials: Holikme dryer vent cleaner kit can easily help you to remove years of built up lint from your dryer vent, making your appliance runs more efficiently and securely; Suitable for most dryer types, please kindly check our product size information for reference in order to better shopping experience

EXTRA-LONG 36" LOW-PROFILE DESIGN Reaches deep under refrigerators, stoves, washers, dryers, couches, and tight appliance gaps that standard vacuum tools cannot reach.

[Stretch Universal Connector] PetOde dryer lint vacuum cleaner attachment is designed with a premium elasticated stretch universal connector that can be connected to most vacuum cleaners! Say goodbye to the worry of purchasing incompatible attachment models
Vacuum Options
- Upright Vacuum: An upright vacuum works well for quick cleanups, especially if it has a long hose attachment. Use it to reach deeper into corners.
- Canister Vacuum: A canister vacuum provides flexibility. Its compact size allows you to easily maneuver under the fridge and into tight spots.
- Handheld Vacuum: Handheld vacuums are ideal for small messes. They offer convenience and portability, making it easier to spot-clean.
- Shop Vacuum: If you have a lot of debris or dust, a shop vacuum can efficiently handle larger messes and has the power for tougher tasks.
- Broom and Dustpan: Use a broom to sweep up debris that the vacuum may miss. A dustpan allows for easy collection and disposal.
- Microfiber Cloths: Microfiber cloths are great for wiping down surfaces. They trap dust and dirt effectively without scratching.
- Mild Cleaner: For stubborn stains, a mild cleaner or solution of warm water and vinegar works well. It helps remove grime without harsh chemicals.
- Flexible Cleaning Brush: A flexible brush helps dislodge dust from hard-to-reach areas. Use it along with a vacuum for thorough cleaning.
- Gloves: Wearing gloves protects your hands from dirt and harsh cleaning solutions while you work.
Gather these tools, and you’ll be ready to tackle the cleaning process under your fridge effectively.
Step-By-Step Guide On How To Vacuum Under Fridge
Cleaning under your fridge maintains efficiency and prevents pests. Follow these steps for a thorough vacuuming process.
Prepare The Area
- Clear the floor area around the fridge. Remove any items like magnets, utensils, or storage boxes that might obstruct movement.
- Identify power supply sources. Unplug the fridge to ensure safety while cleaning.
- Gather necessary tools. Get your vacuum, brooms, microfiber cloths, and a mild cleaner ready for use.
Move The Fridge Safely
- Check for level flooring. Ensure the floor is clean and stable for smooth movement.
- Use your vacuum’s attachment or a broom to remove dust around the fridge before moving it.
- Gently pull the fridge away from the wall. Use caution to avoid damaging the floor or the appliance. A second person can help if the fridge is heavy.
Vacuum The Space
- Attach a brush nozzle to your vacuum. This tool is effective for reaching tight spaces.
- Carefully vacuum the area beneath and behind the fridge. Pay attention to corners and edges where dust accumulates.
- Use a flexible brush for stuck debris. Gently scrub areas with build-up before vacuuming again for a thorough clean.
- Wipe down surfaces. Use a microfiber cloth and mild cleaner to remove any remaining dust and dirt around the fridge edges.
- Replace and secure any items that were moved. Ensure everything returns to its original position.
- Plug the fridge back in and check for proper functioning. Make sure the appliance runs smoothly without obstruction.
Following these steps ensures a clean space under your fridge, promoting better air quality and appliance performance.
Tips For Maintaining A Clean Area
Recommended Products

Home Improvement Hero: Use Sealegend dryer vent cleaner kit to tackle years of built-up lint, boosts your appliance efficiency
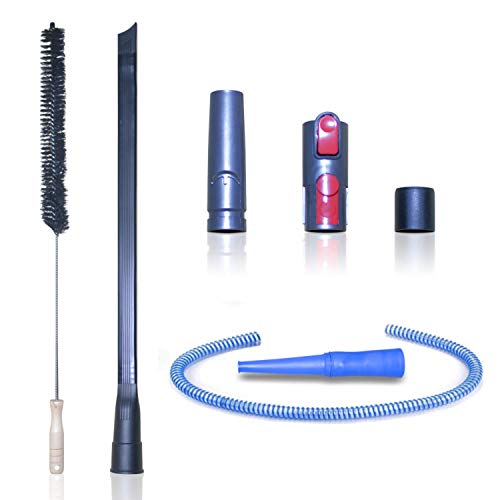
✔ Improve Dryer Efficiency & Preventing Fire Risks of Your Beautiful House: Dryer manufacturers recommend regular lint removal to extend dryer life. By using this tool kit, you can remove years of lint build-up deep within dryer gap, exhaust port and dryer vent so your appliance run more safely and efficiently. Using this dryer lint cleaning brush and flexible vacuum attachment for dryer vent regularly to clean your dryer vent and help prevent deadly dryer vent fires from sparking.

Universal Compatibility: Suitable for use with all 1-1/4-inch or 1-3/8-inch (32mm - 35mm) diameter vacuum cleaners
Regularly Clean Behind the Fridge
Cleaning behind your fridge every three to six months keeps dust and debris at bay. Schedule a reminder on your calendar to ensure you don’t forget.
Use a Vacuum Attachment
Utilize a vacuum cleaner with a hose attachment for easy access. This tool reaches tight spaces and captures dirt effectively without moving the fridge too often.
Keep the Area Clear
Maintain a clutter-free zone around your fridge. Store items like mops or brooms in designated areas to prevent obstruction when you need to vacuum.
Inspect for Leaks
Look for any signs of leaks or spills under the fridge during your cleaning routine. Addressing these issues promptly prevents odors and attracts pests.
Food Safety
Ensure food items stored near the fridge are sealed properly. This tactic minimizes food spills and keeps pests away from the appliance.
Check the Condenser Coils
Clean the condenser coils every six months to a year. Use a brush or vacuum to remove dust buildup. Clear coils improve energy efficiency and extend the fridge’s lifespan.
Use Floor Mats
Consider placing a washable mat under the fridge. It catches spills and makes cleaning easier, reducing the buildup of grime over time.
Avoid Overloading the Fridge
Don’t overcrowd fridge contents. This practice promotes better airflow and reduces the chances of items falling and creating messes beneath the unit.
Employ Simple Storage Solutions
Utilize drawer organizers and bins in your fridge. This organization not only creates a neater space but also makes it easier to spot potential messes before they accumulate.
Conclusion
Cleaning under your fridge might seem like a chore but it’s a small effort that pays off big time. By keeping this area tidy you’re not just promoting a healthier home but also boosting your fridge’s efficiency.
Regular maintenance helps prevent pesky pests and can even extend the life of your appliance. With the right tools and a little planning you can make this task quick and easy. So go ahead and schedule that cleaning session. Your fridge and your home will thank you for it!
Frequently Asked Questions
Why is it important to clean behind my fridge?
Cleaning behind your fridge helps maintain a healthy home environment, prevents pests, and ensures your appliance runs efficiently. Dust and debris can hinder airflow, leading to increased energy consumption and potential malfunction.
How often should I clean behind my fridge?
It’s recommended to clean behind your fridge at least every six months. Regular cleaning helps prevent the buildup of dirt and dust, ensuring better airflow and optimal performance.
What tools do I need for cleaning behind my fridge?
Essential tools include a vacuum with attachments, brushes, and possibly a damp cloth for wiping surfaces. These tools help you effectively remove dust and debris from hard-to-reach areas.
What additional maintenance tips can I follow?
In addition to regular cleaning, keep the area clutter-free, inspect for leaks, and check condenser coils. Using floor mats and avoiding fridge overloading will also help maintain cleanliness and efficiency.
How does cleaning behind my fridge affect air quality?
Cleaning behind your fridge prevents the buildup of dust and allergens, improving the overall air quality in your home. This, in turn, reduces the risk of respiratory issues for you and your family.
Can cleaning behind my fridge extend its lifespan?
Yes, regular cleaning and maintenance can extend your fridge’s lifespan. Keeping the coils clean and ensuring proper airflow helps the appliance run more efficiently, reducing wear and tear over time.
